How To Digitise a Book
The main reason why I wanted to digitise a book was because I wanted to read my books on my Pocket PC. The Pocket PC fits in my pocket and I can take it with me wherever I go, unlike a book, which is just a little bit too big to fit into your pocket.
So I’ve decided to share how I’ve achieved this in the hope that someone else may find it useful.
Requirements
Book to scan
Scalpel or Stanley knife
Guillotine or Scissors
Scanner with ADF (Automatic Document Feeder)
Scanning Software (HP Precisionscan Pro)
File Renaming Software (Total Commander)
Image Cropping Software (Informatik Reformat)
OCR (Optical Character Recognition) Software (OmniPage Pro)
eBook Reading Software (uBook)
Preparing the Pages for Scanning
Remove the books cover by carefully cutting between the cover and the books pages with a scalpel, be careful not to cut through the cover of the book when doing this. I’ve found that pulling the cover away from the pages gently and cutting with the scalpel a little at a time gets good results.
Once the cover has been removed you will notice that the pages are stuck together with glue that cannot be removed easily. What I do is to split the pages into lots of 20 pages and then cut the glue off using a guillotine. Do not attempt to cut too many pages at one time as the pages tend to move and you get an uneven cut. I try and cut just enough off to remove the glue, usually 1-2 millimetres will be enough.
Put your pages of the book together in the correct order and fan them a few times from different edges to make sure that no pages are still stuck together. This is an important step because your scanner will most probably jam up if it encounters a page half stuck to another page.
Scanning the Pages
For this step you will need a scanner, preferably with an ADF, or you will be spending a lot of time scanning each page individually. I use a HP Scanjet 5400C and the HP Precisionscan Pro software to do my scanning. Because the scanner can only scan one side of the paper at a time I have to do two passes. One for the odd numbered pages and one for the even numbered pages. I get the software to scan to a file per page at 300dpi resolution in tiff format. The reason I use a tiff format is because it is a lossless format and does not loose any quality when it is saved, as a jpg file would. This is important as the clearer your image is the easier it will be to OCR later on. Also remember to make sure your scanner is clean and doesn’t have any marks over the scanning area. A tiny peace of dirt when scanning can cause a lot of problems when it comes time to OCR your pages. The Precisionscan software asks for a prefix for the files to be saved, and when it saves the files they are named prefix1, prefix2 etc. The prefix I use is odds_ or even_ depending on which pages I’m scanning.
Renaming the Pages
Because my scanner will on scan one side of a page at a time I have to rename the saved pages so that the books pages are in the correct order. To do this I use a program called Total Commander. It has a feature called Multi-Rename and it allows you to rename multiple files according to rules that you can set up. I use the Count rule which basically is a counter that you can set to increment at a specific rate, 2 in this case so that I can rename my previously saved files to their actual page numbers and not just the order in which they were scanned.
An example will explain this better. So for example lets say I am scanning a book with ten pages, I will have the following files saved to my computer after scanning:
| Actual Page # |
Original Filename |
New Filename after renaming |
| 1 |
Odds_1.tif |
01.tif |
| 3 |
Odds_2.tif |
03.tif |
| 5 |
Odds_3.tif |
05.tif |
| 7 |
Odds_4.tif |
07.tif |
| 9 |
Odds_5.tif |
09.tif |
| 2 |
Even_1.tif |
02.tif |
| 4 |
Even_2.tif |
04.tif |
| 6 |
Even_3.tif |
06.tif |
| 8 |
Even_4.tif |
08.tif |
| 10 |
Even_5.tif |
10.tif |
Here is a screen shot of the Multi-Rename Tool that will easily allow you to rename multiple pages quickly. The Define counter section is the important part to set so that your filenames are correct in relation to the actual page number of the page scanned.
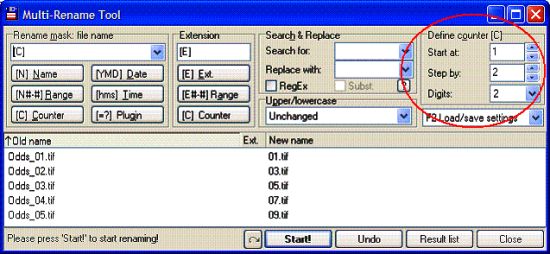

Once the renaming is done all you have to do is list your new filenames in alphabetical order and they will now be in the order of the actual pages of the book.
Cropping your Pages to Size
You may not have to perform this step. But the software I use for scanning Precisionscan will only scan at specific page sizes like legal or A4. So when I am finished scanning a standard sized book I have a lot of white space around the actual scanned page of the book.
To get rid of this I use a piece of software called Informatik Reformat to crop the pages and to collate them into one multipage tiff file.
Below is a screenshot of what it looks like. The main feature I use is to crop, but there are many other features too.
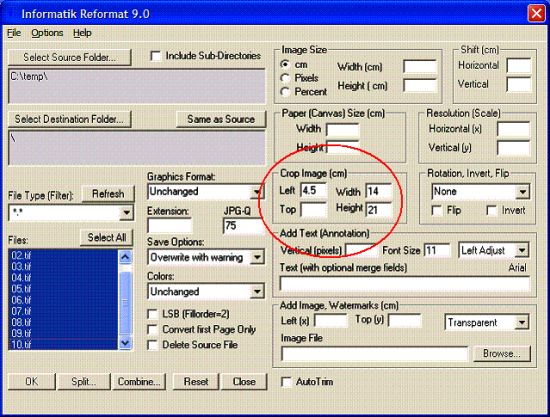
You may have to use some trial and error to determine the exact size, but when you are done just click the Combine button to save your pages to a single file.
Recognising your Pages
The final, and most time consuming, part of the operation is to process your scanned pages through some OCR software. You do not need to do this step, but can just save your pages as an image. But remember this can easily create a book of 20MB in size, where a recognised version of your book could be only 1MB in size.
I use to do this for me. It allows you to set exclusion areas, these are areas that will not be recognised. Like the name of the book or chapter at the top of the page, or the page number at the bottom of the page. Remember we are making an electronic copy of the book and do not need page numbers anymore. These exclusion areas can be saved in a template that can be applied to all pages that are recognised. Just remember to load the template before importing the pages of a book.
OmniPage will first attempt to recognise the words on a page and any that it is unable to recognise or is unsure about it will alert you to so that you can confirm and correct them if necessary.
After you have corrected any errors you can then save your book into various formats including HTML, PDF, DOC or plain text. I save my books as Word Documents and then open up the Word Document in Word and save it as an HTML document. I find Word creates better HTML documents than OmniPage does.
Reading your Digitised Book
I use uBook on my Pocket PC to read my HTML books as it allows you to highlight and annotate your books for later reference. It will also read many other formats, but I find that HTML documents display particularly well on it.
I hope you have found this guide useful. If you have any comments, please let me know.